Almond Flour Banana Muffins

I took advantage of Genevieve’s nap this morning and made some “healthy” muffins. They don’t have any oil or butter and are actually delicious! It also helped me use up a huge bag of almond flour that has been sitting in the pantry for over a year.


Almond Flour Banana Muffins, recipe adapted from Honest Fare

  • 9oz almond flour + some extra for topping
  • 1/2 teaspoon baking powder
  • 2 eggs
  • 3 oz sugar
  • 1/2 teaspoon cinnamon
  • 3 bananas (approximately 1/2 lb peeled) + extra slices for topping
  • 1/2 tsp vanilla extract
  • Pinch of coarse sea salt (optional for topping if you like)
  • 2 tablespoons unsweetened cocoa powder (if doing cocoa center)
  1. Preheat oven to 300F. Grease baking pan of choice (either an 8-9 inch fluted flan tin, a bread dish or muffin tin) and dust with flour OR lightly moisten baking paper and line tin.
  2. Whizz 9 oz almonds and baking powder in food processor until finely ground, but be careful not to go too far or you’ll end up with almond butter. Set aside in bowl.
  3. Whizz eggs, sugar, bananas and cinnamon for about 5 minutes or until pale and really fluffy. Pour over almond meal and stir through.
  4. If adding cocoa powder, place 1/3 of batter into separate bowl and stir in 2 tbs of unsweetened cocoa powder. To create the chocolaty center, first pour 1/2 your original batter into baking tin, then do your dollop of cocoa batter and then pour remaining original batter to cover cocoa. Top with thinly sliced bananas and almonds. Bake about 40-45 minutes for bread and 30-35 minutes for muffins (or until top is browned and skewer comes out clean). You just don’t want to overcook in the oven because they’ll continue to cook a little as they cool. Sprinkle on sea salt immediately after removing from oven.

Applesauce

Last weekend the Lenz family brought us a huge bag of handpicked Fuji apples from their orchard. After keeping the doctor away this week, I decided to turn the last 4 pounds into applesauce. It was so simple that I’m now inspired to go apple picking and test out some other varieties. (Seattle, I miss you!) The best part about applesauce is that it’s super easy to prepare and freezes well. The Neve machine might even get some this winter if her parents don’t eat it all. Yum yum. Applesauce, inspired from Simply Recipes

  • 3 to 4 lbs of peeled, cored, and quartered apples. (Make sure you use a good cooking apple like Golden Delicious, Jonagold, Granny Smith, Fuji, Jonathan, Mcintosh, or Gravenstein.)
  • 4 strips of lemon peel – use a vegetable peeler to strip 4 lengths
  • Juice of half lemon, about 1-2 Tbsp
  • 1 cinnamon stick
  • 1 cup of water

Put everything into a large pot and bring to a boil. Cover with a lid and turn heat down to low. Simmer for 20-30 minutes until the apples are soft enough to mash easily with a spoon. Remove cinnamon stick and lemon peels. Mash with a potato masher until you’ve reached the consistency you desire. Enjoy!

Whole Wheat Banana Chocolate Chip Muffins

I am kind of obsessed with experimenting with whole wheat flour these days. Yesterday we made whole wheat belgian waffles with cardamom and today I made whole wheat banana chocolate chip muffins. Even though they still contain butter and sugar, something about the increased fiber makes me think I should reach for seconds… thirds… fourths? I’m not sharing how many I’ve eaten today but these will definitely stay in the rotation!

Whole Wheat Banana Chocolate Chip Muffins (adapted from King Arthur Flour)

  • 1/2 cup butter
  • 2/3 cup sugar
  • 1 cup mashed banana, about 2 medium or 1 1/2 large bananas
  • 1 large egg
  • 1 teaspoon vanilla
  • 1/3 cup milk
  • 1 1/2 teaspoons baking powder
  • 1/2 teaspoon baking soda
  • 1/2 teaspoon salt
  • 1 cup APF
  • 1 cup WWF
  • 3/4 cup chocolate chips
  • 1 cup chopped walnuts, pre-toasted in a 350°F oven for 8 minutes, if desired

1) Preheat the oven to 350°F. Lightly grease 12 standard muffin cups.

2) In a medium-sized mixing bowl, beat together the butter and sugar till smooth.

3) Beat in the mashed banana, then the egg, flavorings, and milk.

4) Add the baking powder, baking soda, salt, and flours, stirring till smooth; if the mixture has a lot of lumps, beat at a higher speed until they’ve nearly disappeared.

5) Stir in the chocolate chips and walnuts.

6) Heap the thick batter into the prepared muffin cups, mounding them quite full; a muffin scoop works well here. Sprinkle the tops of the muffins with coarse white sparkling sugar, if desired.

7) Bake the muffins for 20 to 23 minutes, until a cake tester inserted into the center of one of the middle muffins in the pan comes out clean.

8) Remove the muffins from the oven, and tilt them in the pan to cool a bit; this will prevent their bottoms from becoming soggy. As soon as you can safely handle them, transfer the muffins to a rack to cool completely.

10-Grain Muffins

I was gearing up to make a batch of bran muffins this morning when I realized I only had  10-grain hot cereal mix instead of the wheat bran. Instead of just the bran, the mix contains red wheat, rye, oats, corn, barley, soy beans, brown rice, millet, and flaxseed. Happy wholesome ingredients yes, but I worried about the grains not absorbing enough liquid to soften up inside of the muffin. Now that I’ve eaten two of them, I can confidently claim that these are awesome – I actually prefer the crunchy texture inside.

Hearing great things about the La Brea Bakery in LA, I found a version of their bran muffins on David Lebovitz’s website. I didn’t have all of the right ingredients so I listed what I actually used below.

  • 2 cups 10-grain hot cereal mix
  • 1 cup, plus 1/2 cup golden raisins
  • 1 cup, plus 1/2
  • 1/2 cup buttermilk
  • a few swipes of fresh orange or lemon zest
  • 1/2 cup packed light brown sugar
  • 1/2 cup vegetable oil
  • 1/2 tsp vanilla extract
  • 1 large egg
  • 1 large egg white
  • 1/2 cup flour
  • 1/4 cup whole wheat flour
  • 1 teaspoon baking powder
  • 1 teaspoon baking soda
  • 1/2 teaspoon salt
Recipe makes 12-18 depending on the size of your muffin tin.

1. Preheat the oven to 350F. Line a 12-cup muffin tin with paper or silicone liners.

2. Spread the wheat bran or hot cereal mix on a baking sheet and toast in the oven for six to eight minutes, stirring a few times so it cooks evenly. Let cool.

3. While the cereal is toasting, heat 1 cup of the raisins with 1/2 cup of the water. Simmer for ten minutes, or until the water is all absorbed. Puree the raisins in a food processor or blender until smooth.

4. In a large bowl, mix together the toasted cereal, buttermilk, 1 cup water, then mix in the raisin puree, zest, and brown sugar.

5. Stir in the oil, egg, egg white, and vanilla.

6. Mix together the flours, baking powder, baking soda, and salt, and sift directly into the wet ingredients. Stir until the ingredients are just combined, then mix in the remaining 1/2 cup raisins.

7. Spoon the batter into the muffin tins, making sure the batter is mounded slightly in each one. Because muffin tins can very in size, if your tins are larger, make fewer muffins.

8. Bake for 25 to 30 minutes, or until the muffins feel set in the center.

9. Let cool in muffin tins for 5 minutes and then carefully remove to cool on a rack.

Recipe Testing – Rugelach

Today we decided to make brunch for one of Alex’s high school friends. Since it’s been at least four years since we’ve strayed from scrambled eggs or cereal at home for breakfast, we kind of went overboard. When Alex learned that I was only serving sliced cantaloupe, rugelach, and pumpkin chocolate chip pancakes, he offered to make scrambled eggs with cherry tomatoes and basil. Needless to say, we haven’t eaten lunch and aren’t all that excited about any kind of dinner tonight.

I chose to make a batch of rugelach for this cycle of recipe evaluations. I had my choice of raisin, apricot, or chocolate filling. I chose the raisins. They were plumped with water, sugar, vanilla, and cinnamon over low heat and then ground up with walnuts and a bit of rum.

I haven’t done much experimenting with pastry and was pleased that I didn’t mess them up! (I don’t have a great track record with pie crusts.) I rolled the dough into a rectangle-ish shape and smothered the filling from end to end. Then you roll it up lengthwise and slice it into smaller pieces. The filling oozed out out of the sides and looked gorgeous.


While only a small feat, it is the exact reason I was so eager to become a Leite’s tester. Trying and evaluating new recipes and techniques gets me out of my comfort zone and forces me to try things that I might not be inclined to make in my everyday life. This recipe was a huge win and I hope to be able to share it soon. Or just invite me to brunch!

Recipe Testing Winner – Almond and Coconut Granola

I’m not a huge granola fan but Alex is. And since it’s his birthday this week and we’re going backpacking this weekend, I figured it was a nice excuse to make some from scratch. A friend suggested that I try eating granola and powdered milk for breakfast while backpacking since it has more calories and will keep me going longer than my usual instant oatmeal.

I prefer to make granola at home rather than buying it in the store because it allows me to control the salt and sugar content as well as to customize the nuts and dried fruit to my liking. It’s also significantly cheaper. For this batch, I followed a simple Leite’s recipe that I evaluated and enjoyed about a month ago. The golden colors remind me of autumn which now that it’s already August, really isn’t that far away. Bring on the butternut!

Lemon Almond Cardamom Tart

Except it isn’t really a tart – it’s more like a sweet frittata. I found it on one of my favorite blogs, Bitchin’ Camero, and planned to make it tonight for Lakshmi. She and I have a thing for cardamom so I figured it would be a winner. It was so much more than that. This is probably the best dessert I’ve ever made and it’s easily one of the happiest desserts I’ve ever had the pleasure of tasting. It’s *that* good. The ground almond, lemon zest, and slow-cooked eggs create a texture unlike anything I’ve ever had before. It’s hard to explain. All I can say is, go make this!

Lemon Almond Cardamom Tart (courtesy of Bitchin’ Camero)

7 large eggs
1 cup cane sugar
1/2 tsp salt
1 cup ground almonds (measure after grinding in the food processor)
1 cup cream
1 cup sliced almonds, more for garnish (I toasted those)
1 tsp freshly ground cardamom
1 lemon (use the zest and juice)
3 TB unsalted butter
Powdered sugar, for garnish

Preheat oven to 400 degrees and set a 10-12 inch skillet over low heat.

In a large bowl, whisk together all ingredients except the last two. Melt the butter in the pan. I used a regular skillet though Mark Bittman used a non-stick for his original tart for which this recipe is based. After the butter has stopped bubbling, pour the batter into the skillet. Cook on low heat until the eggs are just set. This took about 7-10 minutes.

Carefully transfer the skillet to the oven and cook for another 15 minutes, or until the eggs are totally set and the edges are browned. This took more like 20 minutes for me. Be careful not to touch the handle of your skillet!

Remove from heat and let cool before transferring to a serving dish. Sprinkle with toasted slivered almonds and dust with powdered sugar.

Enjoy!

Oops. Well, at least I didn’t go at it alone. Thanks Lakshmi!

Berries galore

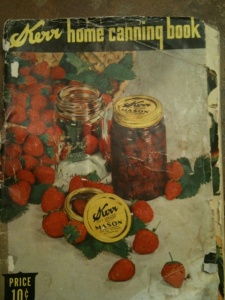
A few months ago I wrote about making lemon curd with some jars I’d been saving up. Well, now that my Grammy has stocked me up with her mason jars and Kerr Home Canning Book (purchased for $.10 in 1944), I decided that today was the day for jam.

kerrs2

I’ve had berries on the brain since feasting on huckleberries while hiking Mount Granite on Friday, and spotting the last few blackberries in Discovery Park while running yesterday. While at the Ballard Farmer’s Market this morning with my friends Kristin and Wei, we saw a sign for “jam berries” and were curious to learn about the difference between their regular and “jam” berries. It turns out that they sell their ripest “must eat now!” blackberries at a discount. Lucky me!

blackberries

As none of us had ever made jam before, we quickly started looking up recipes (pectin, sugar, lemon?) and methods (how do you know when a jar is completely sterile?) before calling my mom to ask about her tried and true tactics. Sometimes technology is more trouble than it’s worth. It seems that everyone has their very own personal method and motto for making jam.

I opted for 1 quart of fruit to 1 cup of sugar and stirred them together to sit for about 10 minutes before heating on the stove. I added a few squirts of lemon juice to the blackberry nectarine combination because it tasted a bit too sweet. Once on the stove, it worked best to boil on high heat for about 5 minutes and then lower to medium for 10-15 minutes. Wearing a pair of dish gloves helped prevent our wrists from being burned by splattering jam.

stew2

In the meantime, we heated the pre-washed jars at 200 degrees in the oven for over 30 minutes and used an oven mitt to carefully hold the jars while filling with jam. I simmered the lids and screw tops in hot water on the stove and put them on once the jars had been filled. After 10 minutes, I turned the jars upside down for about an hour to ensure that the lids had been suctioned against the jar.

Fast forward a couple of hours, and I am the proud owner of 2 jars of blackberry jam, 5 jars of blackberry/nectarine jam, and 1 jar of nectarine jam. Thanks to K&W for helping today and to my Grammy for the jars. This is a very fun new hobby indeed!

Combining family traditions

I’ve been collecting jam, peanut butter, and chutney jars over the last several months to prepare for fruit season this summer. Apparently, there are blackberry bushes all over the parks in Seattle and people go picking whenever they have a berry, tart, or pie craving. Can you imagine, free berries?! While I’ve never made jam, I’m excited to start experimenting this summer. I have countless memories of my mom and Grammy making jam in our kitchen when I was little. They would gather a bunch of fruit from our orchard and then spend a day or two stewing it down, sterilizing the jars, and labeling them with the fruit and date. If I remember right, they made strawberry, apricot, and peach. Probably more. My Grammy recently told me that she was saving the jars for me which I will take ownership of when I head back to the Bay Area this summer. I can’t wait to ask her how old they are.

Tonight I put a few of my own new jars to the test with my mother-in-law’s lemon butter recipe. Her own grandmother made lemon butter and it’s now her tradition to give it away at Christmas. I halved the recipe and will be giving none away.

I wonder how long my own jars will survive and what delightful recipes will be made in and shared from them in years to come.

Full recipe for the Roetter Family Lemon Curd

Grated rind and juice of 8 lemons (rind is optional, but it adds a lot of zing)
1/2 cup unsalted butter, cut up (1 stick)
2 1/2 cups sugar
8 eggs, lightly beaten

Melt the butter with the lemon juice, rind, and sugar in the microwave. Don’t let it get too hot or the eggs will curdle when you add them. In a separate bowl beat the eggs lightly, and pour them through a strainer into the lukewarm lemon mixture.  Microwave on high for 2 minutes, then whisk thoroughly. Return to the microwave for one minute, approximately four times, whisking vigorously in between. The mixture will be somewhat thick, don’t over cook it or it will curdle. It sets up further in the refrigerator. Pour the lemon butter through a strainer into another bowl. Pour into jars, bring to room temperature, cover and refrigerate. It lasts 6 weeks, if it isn’t gobbled up sooner. If you do make smaller quantities, shorten the amount of time in the microwave for each stage.

Biscotti for the brain

I don’t know if I invited my friends over this morning to study or to eat brunch. Does it really matter?

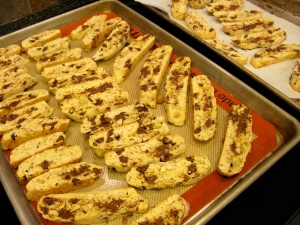
Last week I got my hands on David Lebovitz’s latest book, Ready for Dessert, at the library and decided to try his Almond and Chocolate Chunk Biscotti. The recipe read well and was easy to prepare. (I always get nervous about forming the logs but his remedy for that is to dampen your hands first to prevent sticking- genius!) Biscotti appeal to me because they will satisfy a sugar craving yet aren’t too sweet that I feel guilty about eating more than one in one sitting.  Just ask my study-mates…

Ingredients

2.5 cups all purpose flour
1 tsp baking powder
3 large eggs, room temperature
1 cup sugar
1/2 tsp vanilla extract
1 1/4 cups almonds, toasted and coarsely chopped
7 oz bittersweet or semisweet chocolate, chopped into 1/2 inch chunks (or 1.5 cups chocolate chips)

Preheat the oven to 350F. Line a baking sheet with parchment or a silicone baking mat. In a small bowl, whisk together the flour and the baking powder. In a stand mixer fitted with the whip attachment, whisk the eggs, sugar, and vanilla on medium until the mixture thickens and holds its shape, about 5 minutes. Using a rubber spatula, stir the flour mixture into the egg mixture, then mix in the almonds and chocolate.

On a lightly floured work surface, divide the dough in half. Using dampened hands (again, crucial step!), shape each half into a log 3 inches in diameter. Set the logs lengthwise on the prepared baking sheet, evenly spacing them apart. Dampen your hands and smooth the surface of the logs.

Bake, rotating the sheet midway through baking, until the logs are lightly browned, about 20 minutes. (They will flatten out while baking.) Remove the baking sheet from the oven and decrease the oven temperature to 300F. Let the logs cool on the baking sheet for 10-15 minutes.

After the first go in the oven

After the first go in the oven

Transfer the logs to a cutting board. With a serrated bread knife, cut each log diagonally into slices 1/2 inch thick. Place the cookies, cut sides up, in a single layer on the baking sheet. If necessary, use 2 sheets. Bake until the biscotti are firm, about 20 minutes, flipping them midway through baking. Let cool completely; they’ll continue to firm up as they cool.

The final product

The final product

Storage: The biscotti will keep in an airtight container for up to 1 week.